

Roles & Permissions
Roles & Permissions
The Roles & Permissions section allows administrators to control what users can access and which actions they can perform in the application. Administrators can view existing roles, create new roles, and configure permissions for individual modules according to users' responsibilities.
1. View Existing Roles
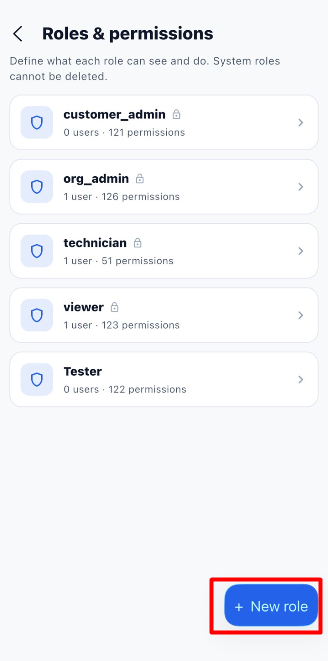
The Roles & Permissions page displays the roles available in the system. Each role card shows the role name, the number of users assigned to it, and the number of permissions associated with it.
| Field / Option | Description |
|---|---|
| Role Name | Displays the name of the role, such as customer_admin, org_admin, technician, viewer, or Tester. |
| User Count | Shows how many users are assigned to the role. |
| Permission Count | Displays the number of permissions associated with the role. |
| Lock Icon | Indicates a system role that cannot be deleted. |
| Role Selection | Opens the selected role's details and permission settings. |
| + New role | Opens the form to create a new role. |
Steps to View a Role
- Open Roles & Permissions from the application settings.
- Review the available roles.
- Check the user count and permission count displayed for each role.
- Select the role you want to review.
- View the role details and its configured module permissions.
Note: System roles cannot be deleted.
2. Create a New Role
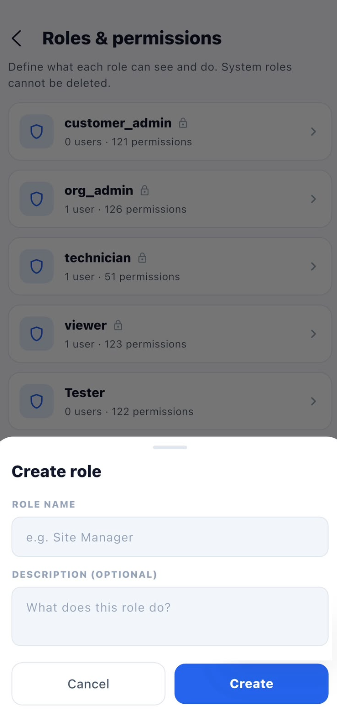
Click + New role to open the Create role form. Enter a role name and, optionally, a description explaining the purpose of the role.
Fields in the Create Role Form
| Field | Description | Required |
|---|---|---|
| Role Name | Enter a name for the new role, such as Site Manager. | Yes |
| Description (Optional) | Explain the purpose of the role and the responsibilities of the users assigned to it. | No |
Steps to Create a Role
- Open the Roles & Permissions page.
- Click + New role.
- In the Role Name field, enter the name of the role.
- Enter a description in the Description (Optional) field, if required.
- Click Create to create the role.
- Verify that the new role appears in the list.
- Select the newly created role to open its permission settings.
Note: Creating a role does not, by itself, define which actions users can perform. Review and configure the role's permissions after creating it.
3. View Role Details and Module Permissions
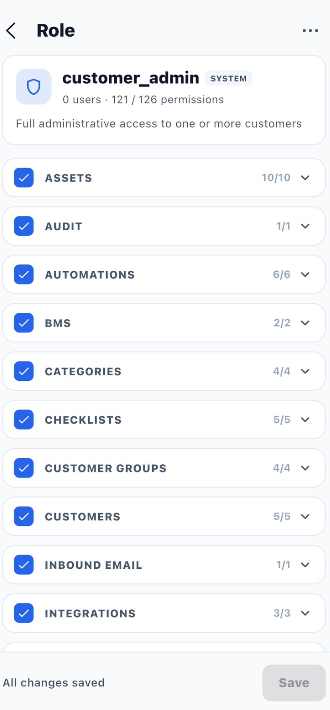
Select an existing role, such as customer_admin, to open the Role details page. This page displays the role type, user count, permission count, and the permissions configured for individual modules.
Role Information
| Field | Description |
|---|---|
| Role Name | Displays the selected role's name. |
| System | Indicates that the role is a system-defined role, when displayed. |
| User Count | Shows the number of users assigned to the role. |
| Permissions | Displays the number of enabled permissions and the total available permissions. |
| Role Description | Explains the purpose of the role, when a description is available. |
Module Permission List
The role details page displays permissions grouped by module. Each module row includes a checkbox, the module name, a permission count, and an expand/collapse arrow.
Examples of modules visible in the screenshot include:
- Assets
- Audit
- Automations
- BMS
- Categories
- Checklists
- Customer Groups
- Customers
- Inbound Email
- Integrations
| Option | Description |
|---|---|
| Module Checkbox | Enables or disables the permissions for the corresponding module, according to the available controls. |
| Module Name | Identifies the application module whose permissions can be configured. |
| Permission Count | Shows the number of enabled permissions compared with the total available for that module. |
| Expand/Collapse Arrow | Opens or closes the module to view its individual permissions. |
| All changes saved | Indicates that the current changes have been saved. |
| Save | Saves pending permission changes when enabled. |
Steps to Configure Module Permissions
- Open Roles & Permissions.
- Select the role you want to configure.
- Review the module list displayed on the Role page.
- Expand a module using its arrow to view the available permissions.
- Review the permissions and enable or disable the required options.
- Repeat the process for other modules as needed.
- Review the permission counts to check the selected permissions.
- Click Save if the button is enabled and changes are pending.
- Confirm that the page indicates the changes have been saved.
Important: Configure permissions carefully. Enabling or disabling a module's permissions can change what users assigned to the role are allowed to access or do.
4. Update an Existing Role
You can select an existing role to review its configuration and update its permissions, where permitted.
Steps to Update a Role
- Open Roles & Permissions.
- Select the required role.
- Expand the module whose permissions you want to change.
- Update the necessary permission settings.
- Review the changes.
- Click Save if required.
- Verify that the changes have been saved.
Note: The available actions may differ between system roles and custom roles.
5. End-to-End Roles & Permissions Workflow
Open Application Settings
        ↓
Open Roles & Permissions
        ↓
View Existing Roles
        ↓
Choose an Existing Role
        ↓
OR
        ↓
Click + New role
        ↓
Enter Role Name
        ↓
Add Description if Required
        ↓
Click Create
        ↓
New Role Appears in the Role List
        ↓
Select the Role
        ↓
Open Role Details
        ↓
View Available Modules
        ↓
Expand the Required Module
        ↓
Configure Module Permissions
        ↓
Review Permission Counts
        ↓
Click Save if Required
        ↓
Verify That Changes Are Saved